How to Create a Free Blog on Blogger.com
Creating a blog is easy, even now what is difficult is choosing the platform. Because right now there are so many blogging platform free which offers its own uniqueness. But specifically for this tutorial, I will discuss a complete tutorial on how to make blog free at platform Blogger.com, a blogging platform free which I'm sure is familiar to your ears.
In this tutorial, I will cover the steps to make blog from the beginning of the sub domain registration, initial settings, choose a theme, then set layouts, create pages and also how to create new posts.
Register Blog
- The first step, make sure you already have a Gmail or Google account. If not, make it first, I won't explain here the steps to create an email.
- If you already have it, just open it Blogger.com or click this link.

- If it's already open, now click Create a Blog.
- Now, login using your Google account.

- After login, Blogger will display a page like this. Fill in Title by the name blog you, then Address with the url address which will be blog link buddy.

- Choose too default templates which will be used as a display design blog buddy. At this stage, just choose as long as you can because later you can replace it with a better choice.
- If you have, click Create Blogs.
- If then you see a popup like this, it means blog buddy, it has been successfully created. Just click No Thanks to close the window.

Making Initial Blog Setup
The first stage of making blog we've finished, now you can say you officially have blog and holds the status as a Blogger.
However, our task is not finished yet. Now it's time to enter the second stage, make initial arrangements before publishing new posts to blog.
Dashboard Panel
Below is what the menu looks like dashboards di blog buddy. Note, on the left there are a number of menus ranging from Posts, Stats to Settings. Well, in this setting stage, we will click the menu Settings first.

- In the Settings menu, there are several things that need to be filled in first, for example the Description column (number 2), then click Save changes if the description column has been filled in.
- The description column is a short description of your blog, a maximum of 500 characters but does not have to be completely full. Because in some templates, this description is displayed on the front page, so if it is too long it will not be pleasing to the eye. Just tailored to your needs.

- Continue to menu Post comments and share.

- This is the settings panel for determining how many articles appear on the front page (number 2).
- While at number 3, is the option to set who is allowed to leave comments. The choice is up to you, there are no fixed rules to be like this and that.
- Option How to Moderate used to control how comments are approved. If set to Always, then the comment will only appear if you have approved it. If selected Never, then the comments will be automatically visible without your consent as the blog owner.
- Continue to menu Language and formatting. This is the setting menu for changing the language blog interface You, then disable translation, change the time zone and date format.

Those are some initial settings you need to do. Some of the other menus are not very vital to adjust now. But, of course it is important to know so that you are more proficient at tinkering blog You.
Changing Blogger Templates
The most important step that must be completed in creating a free Blogger.com blog is changing the template.
At the beginning, I mentioned that the default template can be determined during the sub domain registration process. If at the beginning you have chosen a good template, you still have to learn this stage and do it over and over again to become more proficient.
- Back to topic, now click menu Theme.

- Then notice that in the right pane, there is a pre-installed default template. If you scroll down the screen, you will find a series of default templates from Blogger that can be used as needed for free.

- Just click on one of the templates, then a button will appear Preview, Customize and Apply. Choose Apply to apply the selected template.
- At this stage, your blog template has been successfully changed. Just click View your blog at the top left to see the changes.
Changing Blogger.com Templates The Newest Second Way
- In addition to the methods above, you can also replace template Blogger.com with third-party designs. I mean, you can search template from elsewhere - free or buy - then upload template it to your blog. In this way, design blog You will be completely different from not using template default from Blogger.com.
- How? That's easy. Click the three dots on the right. Your position is still on the menu Themes. Then a new popup will appear, select Restore.

- Then click the button Upload, choose fillet XML in your laptop and the system will automatically process the request. Once uploaded, the template will automatically change without any notification, unless the upload fails.

Customize Blogger.com Templates
Settings are done, template has also been replaced. Now, it's time for you to customize or redesign the look template which was uploaded above.
- The trick, still in the Theme menu, just click the button Customize or Customization.
- Then you will be sent to a panel like screenshot below this.
- At the top there are several menus, including: Themes, Backgrounds, Advanced and Gadgets. Each of these panel menus will show different advanced options, for example the Themes menu will show some basic color options.

- Then if the menu background selected, a background color option will appear that can be selected and then adjusted to individual tastes.

- The other menus will also be the same, you can find further options and customizations and then apply them according to your individual taste. Another example, click menu Advanced then you will get advanced options to change the font, size and color for the title blog. You can learn the other menus one by one.

Setting Blogger.com Layouts
We come to the layout stage, a vital stage that you must understand if you want to create a blog on the platform blogger.com.
As the name implies, layout is used to adjust the position of each element of the templates. For example, calendar gadgets, recent articles, archives and labels. In the layout, you can move, add and remove these items freely. This action cannot be performed from any other panel, not even Themes or Customizations.
- Click the Layout menu.
- Next, you will find columns and rows with different labels. Contact with number 1, this is the featured post panel which if you move it to column or row number 2 then its position is blog will also change.

- Box number 2 is the area where the articles you post will appear. Do not tamper with this part, leave it like this.
- Finally, box number 3 is a sidebar box or blog side which is usually home to compact gadgets such as calendars, labels, pages, latest articles and others. This section can also be moved according to taste, or added with new gadgets offered by Blogger.com.
Creating a New Page on Blogger.com
The page has many functions, it can be used as a profile page, for contacts, for service policy information and others. Unlike posts, pages are static and do not shift over time. So that information that is fixed in nature is highly recommended to be placed on the page.
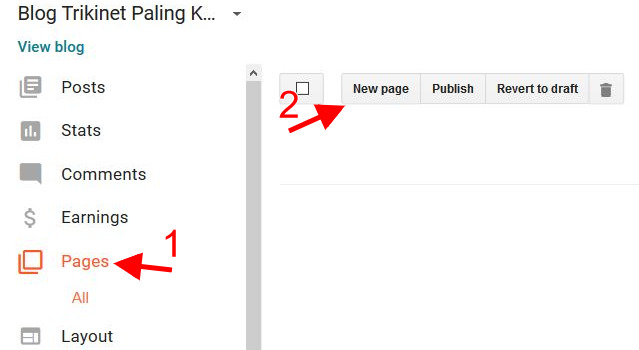
- To create a new page on Blogger.com simply click the menu Pagesor Pages.
- Then on the right side click the button New Pages.
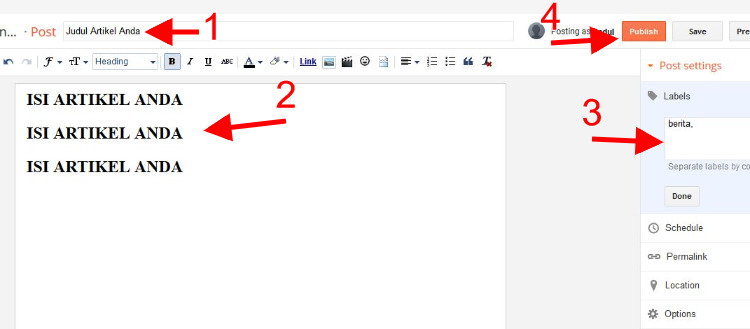
- Next, the editor page appears as you would find in Microsoft Word. The difference is, here you have to create a page title first (number 1), then continue by filling in the page content (number 2) and click Publish(number 3) if the data is considered complete.

- After clicking Publish, the page will appear in the Pages menu. The published pages can still be edited if needed.
Creating a New Post on Blogger.com
This last part is the most important stage and will be the menu that you encounter the most every time login ke blog dashboard. The stage I mean is how to create a new post on the blog.
- This stage begins by clicking on the Posts menu then on the right, find and click the button New Post or New Entry.

- Just like when you create a new page, you will also find a new editor window. The difference is, here the steps are more complex. The order is like this:
- Number 1: make the title first
- Number 2: the content of the main article.
- Number 3: make labels between one to three words, separated by commas. This label is the same as a category or hashtag which will group posts under the same label.
- Number 4: Publish, done.
- In simple terms, those were the stages in making a new article. But, there are actually a few other things that you also need to learn. We'll discuss it next.
Creating Scheduled Posts
This feature is quite useful because it allows you to schedule posts on the day, date, month and even year you want. Usually, this feature is used if I have plans to travel that day. So the system will automatically publish the article according to the time I set earlier.
- The trick, when creating a new post, on the right click Schedule - Set date and time.
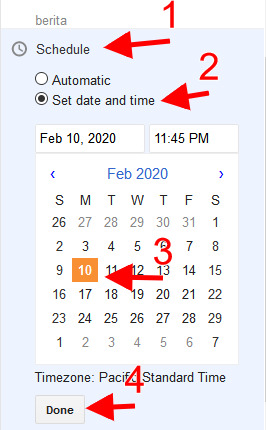
- Then choose the date, month and year when the article should be published. If it feels right, click the button Done. Done!
- After this adjustment is made, the article will be posted automatically on that date.
Editing Article Permalinks on Blogger.com
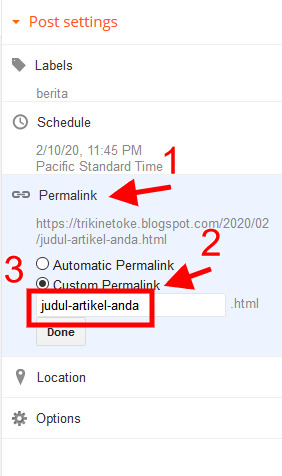
Another knowledge that you also need to master, namely editing permalink articles on Blogger.com. Why is it important? Cause, format permalink become one of the most crucial factors in SEO techniques.
- In the position of writing a new article, click Permalinks - Custom Permalinks.
- Then fill in the fields that appear, but with the condition that each word must be separated by (-). Unfortunately, the number of supported characters is not much, so you must use this feature wisely.
Adding Images to Blog Posts
Articles that consist of a combination of text, images and videos are certainly much more interesting than just plain text plates without decoration. You should also follow this rule even though the blog platform used is labeled free.
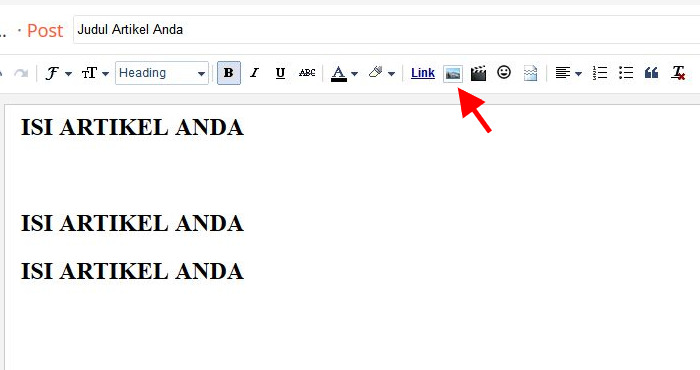
- At Blogger.com, you are given the freedom to add images to your blog. To do this, position the cursor where the image will be added, then click the photo icon next to the Link menu.
- Then a new popup window will appear like this. Continue by clicking the button choose files if you want to upload new image from laptop. However, Blogger.com also offers other options, such as fetching from Google Albums, from your phone or from certain sites supported by their system.
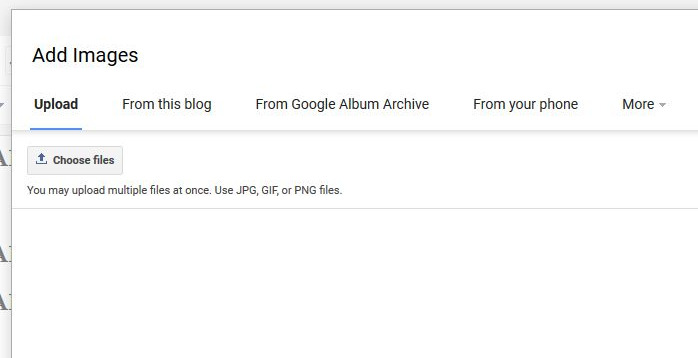
- A file explorer window will appear where you are asked to select the image file you want to add to your blog.
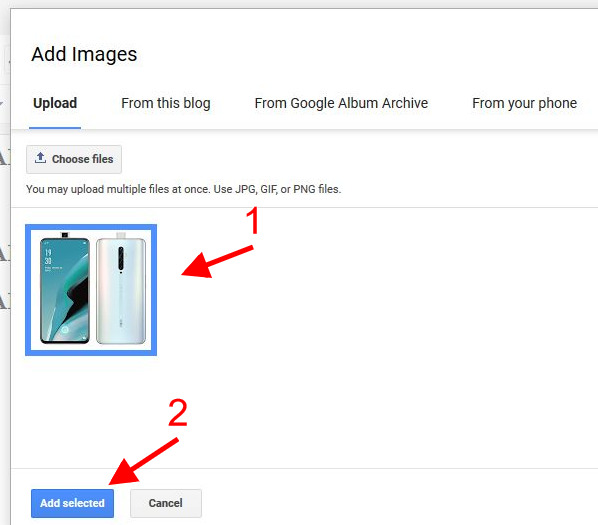
- If it's been uploaded, mark the image and click Add Selected.
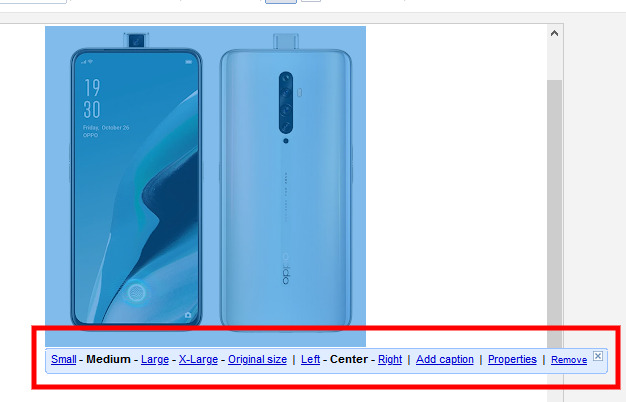
- Done, the image has been added to the article. Now, to set the size, alt title, orientation and so on, just click on the image and the options will appear. So, all you have to do is arrange and complete anything that needs to be done.
Understanding Blogger Toolbar Menu Functions
It feels like a complete guide on how to create a free blog on Blogger.com, there is only one discussion that I think needs to be conveyed as well, namely regarding the function of the toolbar menu on the editor page, either on the page or in the post.
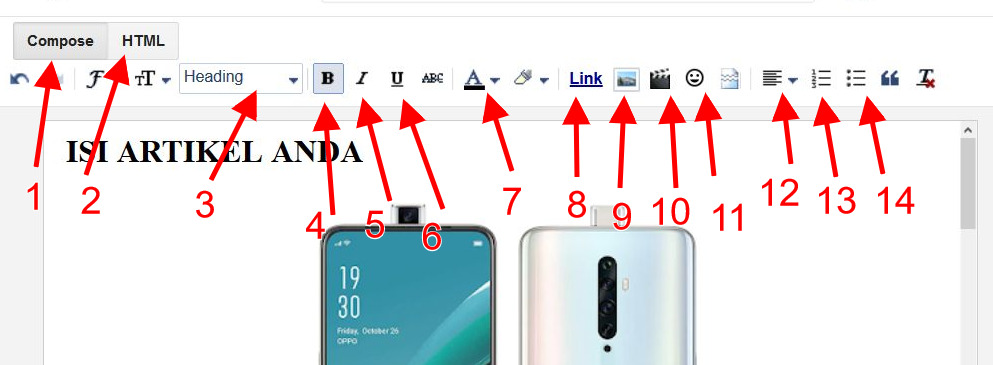
Well, the picture above is what I mean. Here I have marked it with numbers and arrows, so that my friend understands it easier.
- Compose mode: to display the editor in visual form, for example to display bold format in bold visuals.
- HTML mode: the opposite of compose mode, this mode will display the editor in the form of html coding. If I used bold format as an example, then in HTML mode the bold format will be shown with bold code, not in visuals that look thicker than other letters.
- This heading is to create subtitles other than the main title, usually to mark a new discussion.
- Bold format, to bold letters or numbers.
- Italic format to italicize a word or sentence.
- Underline format to underline words or sentences.
- To color text
- This link is to insert a link or hyperlink
- This we discussed earlier, to add images.
- To add videos from YouTube or own uploads.
- Emoticon
- Set the orientation of the text, whether you want it to be left-aligned, center-aligned, right-aligned or left-aligned.
- This is for a number listing.
- While this is for listing points.
Done, that's mostly an explanation of the function of the buttons in the Blogger.com editor panel. Hopefully with this information, it will be easier to understand what it does.
That's the tutorial on how to make a free blog on Blogger.com, hopefully it's useful!
Sign up for our
newsletter
Review Order
Monthly
IDR 150.000
Payment Details
Subscribe Monthly
Total payment
By clicking the payment method button, you are read and
agree to the
terms and conditions of Dailysocial.id